Warnings
- Keep dry and out of whether
- The Roller Blaster® must be used with a Residual Current Device ( RCD )
- The Roller Blaster® is only to be used with water-based paints
- Do not use in direct sunlight or hot areas and keep a 30cm clear space from the left and right side for ventilation.
- Roller Blaster Limited does not accept any liability for damage caused by waste-water spillage or leakage.
- Use safety Glasses and Ear protection
- Never turn water source on with the lid open
- If doing 20 cleans back to back, allow the Roller Blaster to cool for 20 minutes before cleaning again
- After each use allow 45 seconds before using again.
- Dwell time between cycles – please rest at least 45 seconds before starting your next cycle.
- But in this 45 seconds you can:
- Cycle end lid locked for 3 seconds (controllerd by Unit)
- Press lid open button
- Open lid
- Remove clean roller with handle from unit
- remove clean sleeve from the handle
- Install dirty sleeve on the handle
- Place the dirty sleeve/handle in the Roller Blaster
- Close the Lid press the start button
Setting up the Roller Blaster®
- Position the Roller Blaster® on a flat level surface.
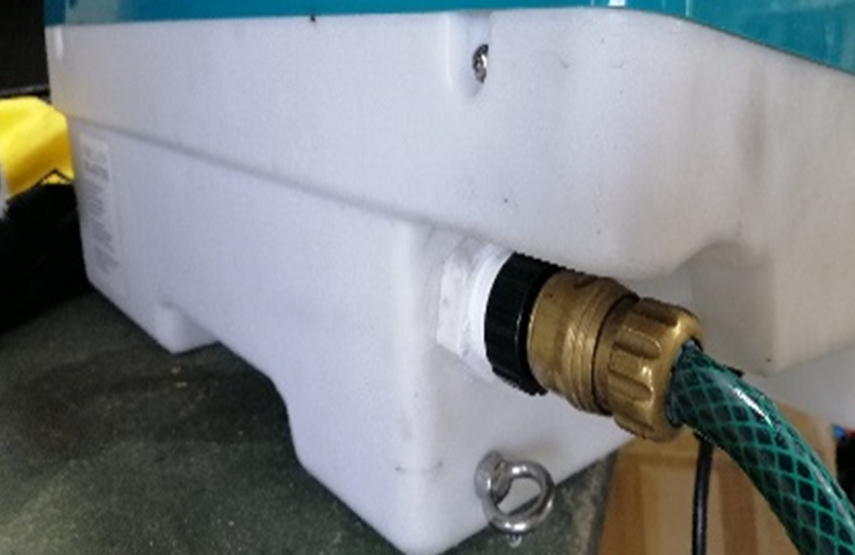
- Ensure the lid is closed, then screw on the male hose fitting provided hand tight and connect it to your mains water supply using a standard 12mm hose connection fitting (see Fig. 1).
- minimum pressure 10 psi
- Maximum 100 psi
- Minimum flow 10 liters per minute
- Ensure the lid is closed and turn on the water. Check hose has no leaks
Note: For the first use the water may drain out the exit of the machine for a minute or so, Make sure you have something to catch it. We also recommend turning off the water supply after you have finished cleaning to avoid a hose failing. - Plug the Roller Blaster® in to a 230-volt 50 hz power supply with a residual current device (RCD) and turn on. Never use the Roller Blaster with out the RCD’s protection. Always test the correct operation of the RCD before using the Roller Blaster each time.
Before you start cleaning
- The Roller Blaster® is designed to suit most 230mm and 270mm trade painter’s roller handles, with a bar thickness of between 8 to 9.0 mm. However, if you want to clean a smaller length roller sleeve, simply put it on to a 230mm or 270mm roller handle and clean as normal.
- Ensure that the handle is clean and free from any paint build up, especially around the area where it is clamped into the machine. It is also important that the handle spins freely.
- We recommend using a new handle for best cleaning performance
Warning: Paint build up on the handle or a worn handle can stop the Roller Blaster® from cleaning effectively. In extreme situations build-up may break the chassis or cause severe vibration which could harm the Roller Blaster® machine. We recommend using a new clean handle for best results and to avoid damage.
Operating the machine
- Please inspect the water hoses and other critical parts before each use
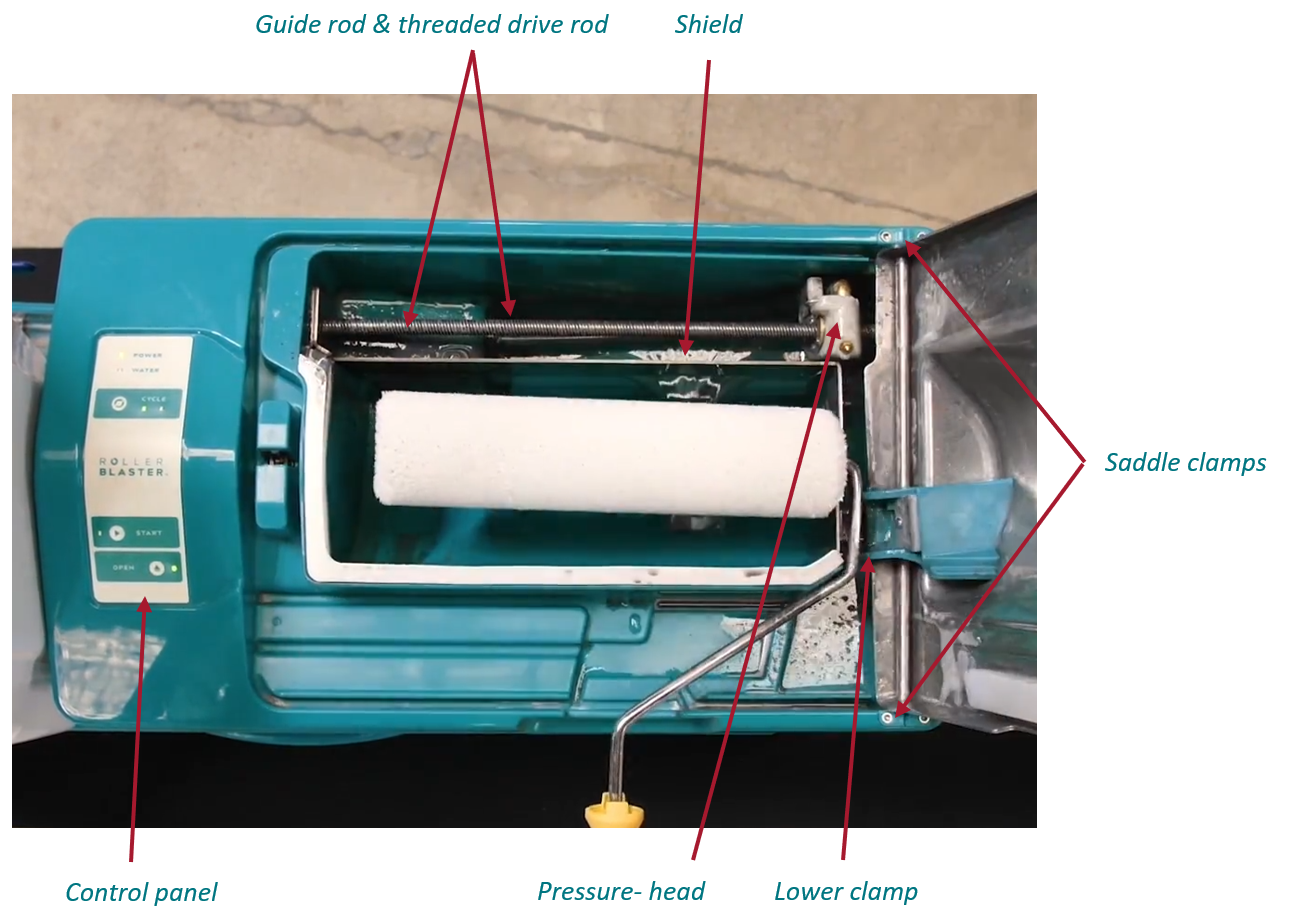
- Open the lid by pushing the open button. Place the roller handle with the roller sleeve on it, into the Roller Blaster®. Position the handle into the lower clamp (See Figure 2)
- Close the Lid by pushing firmly on the lid handle area until it clicks.
- Press the start button, the start button will flash a green light whilst in cycle and the lid light will turn off to indicate it cant be opened flashing to indicate it cannot be opened. Note, there is a 3 second delay before the Roller Blaster® starts.
- The Roller Blaster does a 45 second thorough clean. If you wish to have a faster clean hold down the strat button for more than 3 seconds but less than 8.
- Once the cycles have finished the Roller Blaster will keep the lid locked for 5 seconds, the start button light will turn solid green and the open light will turn green. The lid can now be safely opened.
Tip: Rest your hand on the lid handle whilst you press the lid open button with your thumb to avoid drips landing back on to your roller sleeve
Note: At any time, you can pause the Roller Blaster® by pressing the start button again, you still won’t be able to open the lid until the open light turns on.
Care and maintenance
Cleaning
- To keep your Roller Blaster® clean we recommend that after you have finished cleaning sleeves you run the machine once more so it can clean itself.
- If dried paint build-up occurs in some areas, you can remove this with mineral turpentine and a rag. Warning: Take care around the Control Panel not to soak it – spot clean with a damp rag only. Excessive turpentine will damage the control panel.
Long Term Care
For the most part the Roller Blaster® is designed to look after itself with a couple of exceptions.
Once a month do the following:
- Check hoses inside the unit are in good condition and there are no leaks or undue wear.
- Clear any paint and fluff build up in the waste-water exit of the machine.
- Check the filter in the clean water hose connection entrance and clean it if necessary
- The threaded drive rod and guide rod need lubricating. You can do this by simply applying grease with your finger along the length of these
If the Threaded drive rod and guide rod, run out of lubrication the Roller Blaster® will shut down to prevent harm and the 2 lights will start flashing. Open the lid then turn off the power and grease the threaded drive rod and guide rod, then manually twist the threaded drive rod until it loosens up. Finally grease the dry area too. Turn the power back on. You are now ready to go again.
Saddle clamp Replacement
Remove the two screws in the front and back of the saddle clamps using an Allen key. Open the lid fully, then gently lift the lid to pop out the saddle clamps. Slide on the new saddle clamps, then with the lid in the open position (this avoids knocking of the white seal) slide the saddle clamps and lid into position. Screw down both sides.
Warning: Do not over tighten, hand tight is enough
The noise emission
The noise emission, measured in accordance with EN-62841-1, as follows
Weighted emission sound pressure level LpA=8101 db and its uncertainty Kpa= 3db;
Weighted sound power level LWA=89.1db and its uncertainty KWA=3db
Warning: The noise emissions during actual use of the power tool can differ from the declared values depending on the ways in which the tool is used especially what type of work place is processed; and need to identify safety measures to protect the operator that are based on an estimation of exposure in the actual conditions of use.
Hearing protection used for appropriate conditions will reduce personal injuries, recommendation for the operator to wear hearing protection.
Download this guide (PDF format – 350kb)